TL;DR:
- Regular vent cover cleaning every 3-4 months and professional HVAC inspections every 1-3 years improve indoor air quality and system efficiency. Proper cleaning involves thorough drying and careful removal of dust from vents and accessible duct sections using household tools or professional equipment when necessary. Homeowners should recognize signs of contamination and seek professional help for deep duct cleaning or mold and pest issues beyond basic maintenance.
Vent cleaning is defined as the systematic removal of dust, debris, allergens, and contaminants from air vent covers, grilles, and the accessible portions of your home's ductwork. This beginner's guide to vent cleaning walks you through every step, from the tools you need to the signs that call for a professional. Indoor air can be 2–5 times more polluted than outdoor air, and your HVAC system circulates that air 5–7 times every day. That means dirty vents are not just an eyesore. They are an active source of the air you breathe. Experts recommend wiping vent covers every 3–4 months and scheduling full HVAC inspections every 1–3 years. Start with the basics, build a routine, and your home's air quality will reflect the effort.
1. what the beginner's guide to vent cleaning actually covers
Vent cleaning, in the industry, falls under the broader category of HVAC system maintenance and ventilation system cleaning. The term covers two distinct tasks: cleaning the vent covers or grilles you can see and touch, and cleaning the interior duct passages that carry conditioned air through your walls and floors. Most beginners can handle vent cover cleaning with basic household tools. Interior duct cleaning beyond the first few inches typically requires specialized equipment or a certified technician.
The National Air Duct Cleaners Association (NADCA) and the EPA both distinguish between surface vent cleaning and full system cleaning. Understanding that difference saves you money and prevents you from either over-cleaning or under-cleaning your system. This guide covers both levels so you can make an informed decision about what your home actually needs.
2. tools every beginner needs before starting
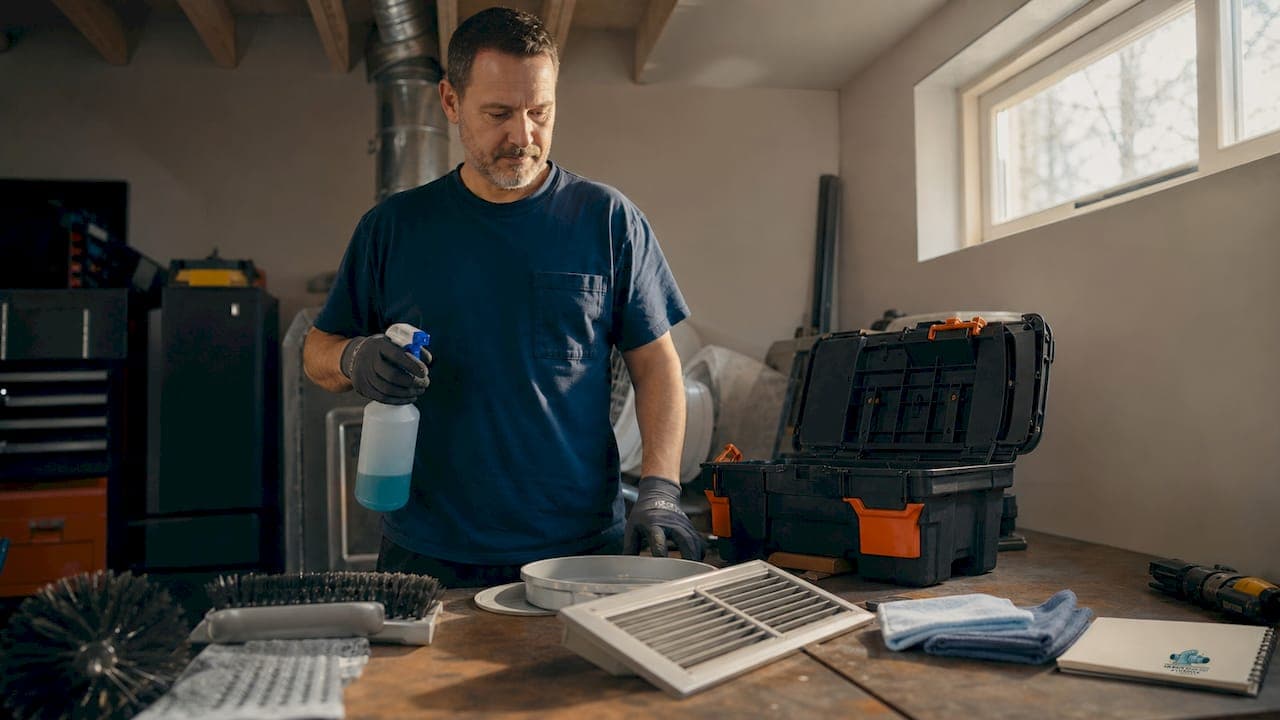
The right equipment makes vent cleaning faster, safer, and more effective. You do not need a professional kit to clean vent covers and accessible duct openings. You do need the right combination of tools to avoid damaging delicate grille surfaces or spreading dust into the room.
Must-have tools:
- Vacuum cleaner with a brush attachment for pulling loose dust from vent covers and duct openings
- Flathead and Phillips screwdrivers for removing vent cover screws
- Soft-bristle brush for scrubbing vent covers without scratching the finish
- Microfiber cloths for wiping down covers and surrounding wall surfaces
- Mild dish soap and warm water for soaking and washing metal or plastic vent covers
- Bucket or utility sink large enough to submerge vent covers fully
Optional tools for deeper cleaning:
- Rotary brush kits designed for duct interiors, available at hardware stores like Home Depot or Lowe's
- Air whips that attach to a shop vac and agitate dust inside duct passages
- Flashlight or phone camera to inspect duct interiors before and after cleaning
Pro Tip: An old toothbrush is one of the most useful tools in your kit. Use it to scrub dust out of the narrow slots and crevices on metal vent covers where a larger brush cannot reach.
Turning off your HVAC system before you start cleaning is non-negotiable. Running the system while you clean pushes loosened dust deeper into the ducts and can pull debris into the blower motor. Flip the thermostat to "off," not just "fan auto," before you remove a single vent cover.
3. how to clean vent covers step by step
This is the core of any home vent maintenance routine. Follow these steps in order and you will get a thorough clean without damaging your vents or spreading dust through the room.
1. Turn off the HVAC system. Set your thermostat to off before touching any vent. This stops airflow and prevents dust from circulating while you work.

2. Remove the vent cover. Use a screwdriver to loosen the screws holding the cover to the wall, floor, or ceiling. Set screws in a small cup so they do not roll away. Lift the cover straight out and set it aside.
3. Vacuum the duct opening. Insert the vacuum hose with a brush attachment as far as it comfortably reaches into the duct. Move it slowly to capture loose debris. Do not force the hose deeper than 12 inches without a proper duct cleaning kit.
4. Vacuum the vent cover itself. Hold the cover over a trash bag or outside and vacuum both sides. This removes the bulk of the dust before washing.
5. Soak the vent cover. Fill a bucket or sink with warm water and a few drops of mild dish soap. Submerge the cover and let it soak for 10–15 minutes. This loosens caked-on dust and grime without requiring aggressive scrubbing.
6. Scrub gently with a soft brush. Use a soft-bristle brush or an old toothbrush to work through the slots and edges. Avoid abrasive scrubbers like steel wool or rough sponge pads. These scratch metal finishes and strip paint from painted covers, creating rough surfaces that collect dust faster.
7. Rinse thoroughly. Run clean water over the cover until all soap residue is gone. Soap left in the slots attracts dust and creates a sticky film over time.
8. Dry completely before reinstalling. Lay the cover on a clean towel and allow it to air dry fully. A damp vent cover reinstalled in a wall or ceiling creates the exact conditions mold needs to grow. Vent covers must be 100% dry before they go back in place.
9. Reinstall and repeat. Screw the cover back into position, then move to the next vent. Work through every vent in the home before turning the HVAC system back on.
Pro Tip: If a vent cover has tight slots that will not air dry quickly, use a hair dryer on the low heat setting to speed up drying. Hold it 6 inches away and move it continuously to avoid warping plastic covers.
4. cleaning inside the ducts: what beginners can safely do
Cleaning the interior of your ducts goes beyond vent cover maintenance. Most homeowners can safely clean the first 12–18 inches of a duct opening using a vacuum with a long hose attachment. Beyond that, the duct system branches, bends, and connects to components like the blower motor, coils, and heat exchanger. Those areas require professional tools.
Use a flashlight or your phone camera to look inside each duct opening after removing the cover. You are checking for visible dust buildup, dark staining (a sign of mold), insect activity, or debris like drywall dust from past renovations. If you see any of those conditions, stop and call a certified technician rather than attempting to clean deeper yourself.
For routine maintenance, insert a vacuum hose with a brush attachment and work it slowly along the accessible duct walls. Move the hose in a back-and-forth motion to dislodge dust from the sides. Follow up with a dry microfiber cloth wrapped around a long handle to wipe the interior walls of the duct opening. This air vent cleaning workflow handles the surface-level buildup that accumulates between professional cleanings.
5. DIY vs. professional vent cleaning: which one do you need?
The EPA states no universal recommendation exists for routine duct cleaning. The EPA's position is that cleaning should be triggered by specific conditions, not a fixed calendar schedule. That guidance matters because it means you do not need to pay for professional cleaning every year by default.
Signs that professional cleaning is the right call:
- Visible mold growth inside ducts or on vent covers
- Evidence of rodent or insect infestation inside the duct system
- Ducts clogged with excessive dust or debris after a renovation
- Persistent musty odors coming from vents when the system runs
- Allergy or respiratory symptoms that worsen when the HVAC is on
Professional air duct cleaning services typically cost $450–$1,000 depending on system size and contamination level. That range reflects real differences in labor, equipment, and access complexity. A small single-story home costs less than a two-story home with a complex duct layout.
One important distinction: effective duct cleaning requires cleaning the entire HVAC system, not just the ducts. Cleaning only the duct passages while leaving dirty coils, blower motors, and heat exchangers in place means the system recontaminates the ducts within weeks. NADCA-certified technicians use negative pressure vacuum systems combined with agitation tools to clean the full system at once.
| Factor | DIY Cleaning | Professional Cleaning |
|---|---|---|
| Cost | Low (tools only) | $450–$1,000 |
| Equipment | Vacuum, brushes, cloths | Negative pressure systems, rotary brushes |
| Scope | Vent covers and duct openings | Full HVAC system including coils and blower |
| Best for | Routine maintenance | Mold, pests, post-renovation, heavy buildup |
| Frequency | Every 3–4 months | Every 1–3 years or when conditions arise |
| Certification needed | No | NADCA-certified recommended |
6. your vent cleaning checklist for ongoing maintenance
A consistent maintenance schedule prevents the heavy buildup that makes cleaning difficult and costly. Use this vent cleaning checklist as your ongoing reference for home vent maintenance.
Every 3–4 months:
- Wipe down all vent covers with a dry microfiber cloth
- Vacuum vent cover surfaces with a brush attachment
- Check for visible dust accumulation around vent openings
- Note any unusual odors when the HVAC system runs
Every 6–12 months:
- Remove and wash all vent covers using the full step-by-step process above
- Inspect duct openings with a flashlight for mold, debris, or pest activity
- Check HVAC air filters and replace if visibly dirty. HVAC filters should be replaced 1–2 times annually at minimum, and more often in dusty climates like Avondale, Arizona
- Test airflow from each vent by holding a tissue near the opening when the system runs
Every 1–3 years:
- Schedule a full HVAC inspection with a certified technician
- Consider professional duct cleaning if any checklist items above reveal problems
- Inspect duct connections and seals for gaps that allow conditioned air to escape
Moisture control deserves its own attention. Damp ducts are the primary environment where mold takes hold, and moisture in ducts is a leading reason professional cleaning becomes necessary. Fix any plumbing leaks near duct runs, check that bathroom exhaust fans vent outside rather than into the attic, and keep indoor humidity below 50% with a dehumidifier if needed.
Regular vent cleaning improves HVAC efficiency and reduces household energy bills. Cleaner vents allow air to move freely through the system, which means the blower motor works less to maintain your set temperature. That reduced strain translates directly to lower monthly utility costs.
Pro Tip: Keep a simple log of your cleaning dates and any observations (odors, visible dust, airflow changes) in a notes app or a sticky note on your HVAC unit. This record helps you spot patterns and gives a technician useful context if you ever need a professional inspection.
For homeowners who want to go deeper before calling a pro, these DIY vent inspection tips cover exactly what to look for and how to document what you find.
Key takeaways
Consistent vent cover cleaning every 3–4 months, combined with professional HVAC inspection every 1–3 years, is the most effective system for maintaining indoor air quality and controlling energy costs.
| Point | Details |
|---|---|
| Clean vent covers regularly | Wipe or wash covers every 3–4 months to prevent dust buildup and maintain airflow. |
| Always dry covers fully | Reinstalling damp vent covers causes mold growth inside walls and ducts. |
| DIY has clear limits | Vacuum duct openings up to 12–18 inches; deeper cleaning requires professional equipment. |
| Call a pro for specific triggers | Mold, pests, post-renovation debris, and persistent odors require certified technician service. |
| Full system cleaning matters | Cleaning only ducts without addressing coils and blower motors leads to rapid recontamination. |
What i've learned after years of watching homeowners clean vents
The most common mistake I see beginners make is skipping the drying step. They wash the vent covers, shake off the water, and screw them back in while still damp. Within a few weeks, there is a musty smell coming from that vent. The fix takes five minutes of patience. The consequence of skipping it can take a professional remediation visit to correct.
The second mistake is treating "duct cleaning" and "vent cleaning" as the same thing. They are not. Cleaning your vent covers is a maintenance task you should own completely. Cleaning the interior duct system is a different job that requires different tools and, in many cases, a certified technician. Conflating the two leads homeowners to either overspend on professional visits for tasks they could handle themselves, or to attempt deep duct cleaning with a household vacuum and wonder why the problem persists.
My honest advice: start with the vent covers. Get comfortable with the removal, washing, and drying process. Inspect your duct openings every six months with a flashlight. If you see anything beyond ordinary dust, check the key signs you need duct cleaning before deciding on next steps. Most homeowners who follow a consistent surface-cleaning schedule find they need professional service far less often than they expected. That is the goal. Build the habit, know your limits, and your HVAC system will reward you with cleaner air and lower bills for years.
— Shaun
When DIY is not enough: professional help in avondale
Some vent and duct problems are simply beyond what a vacuum and a soft brush can fix. Airanddryerventcleaningavondale provides certified air vent and duct cleaning for residential and commercial properties throughout Avondale, Arizona. The team handles everything from routine vent cleaning to full HVAC system cleaning, dryer vent cleaning, air quality testing, and duct repairs. Every service is backed by warranties and flexible scheduling, including after-hours options. If your inspection turns up mold, heavy buildup, or airflow problems that cleaning alone will not solve, Airanddryerventcleaningavondale is the local specialist to call.
FAQ
How often should i clean my home's air vents?
Wipe down vent covers every 3–4 months and do a full wash every 6–12 months. Schedule a professional HVAC inspection every 1–3 years, or sooner if you notice mold, odors, or reduced airflow.
Can i clean air ducts myself without professional tools?
You can safely clean the first 12–18 inches of duct openings with a vacuum and brush attachment. Deeper cleaning requires negative pressure equipment and agitation tools that professionals use to clean the full HVAC system.
What are the signs i need professional duct cleaning?
The EPA identifies visible mold, pest infestation, and heavily clogged ducts as the primary triggers for professional cleaning. Persistent musty odors and worsening allergy symptoms when the HVAC runs are also strong indicators.
Does cleaning vents actually lower energy bills?
Yes. Cleaner vents allow air to move freely, which reduces strain on the blower motor and lowers the energy needed to maintain your set temperature. Regular maintenance directly supports lower monthly utility costs.
Is it safe to clean vents while the HVAC system is running?
No. Always turn the HVAC system fully off before removing vent covers or cleaning duct openings. Running the system during cleaning spreads loosened dust through the ducts and can pull debris into the blower motor.