TL;DR:
- A systematic duct inspection workflow involves occupant interviews, visual surveys, camera inspections, and quantitative testing to accurately assess duct conditions. Proper use of tools like borescopes, duct blasters, and pressure gauges provides evidence-based data, guiding targeted cleaning and repairs. Condition-based inspections help homeowners and professionals avoid unnecessary work while maintaining HVAC efficiency and indoor air quality.
A routine duct inspection workflow is the systematic process homeowners and property managers use to assess duct conditions, identify contamination or leaks, and maintain HVAC efficiency and indoor air quality. The industry standard behind this process is the NADCA ACR Standard (Assessment, Cleaning, and Restoration), which separates inspection from cleaning and requires documented evidence before any work begins. Tools like borescopes, duct blaster fans, and digital manometers are the backbone of a thorough assessment. Getting this workflow right means you spend money on cleaning only when the data says you need it, not on a calendar guess.
What tools and prep does a routine duct inspection workflow require?
The right tools determine whether your inspection produces real answers or just guesses. A professional duct inspection process relies on three categories of equipment: visual tools, diagnostic instruments, and documentation gear.
Visual and camera tools
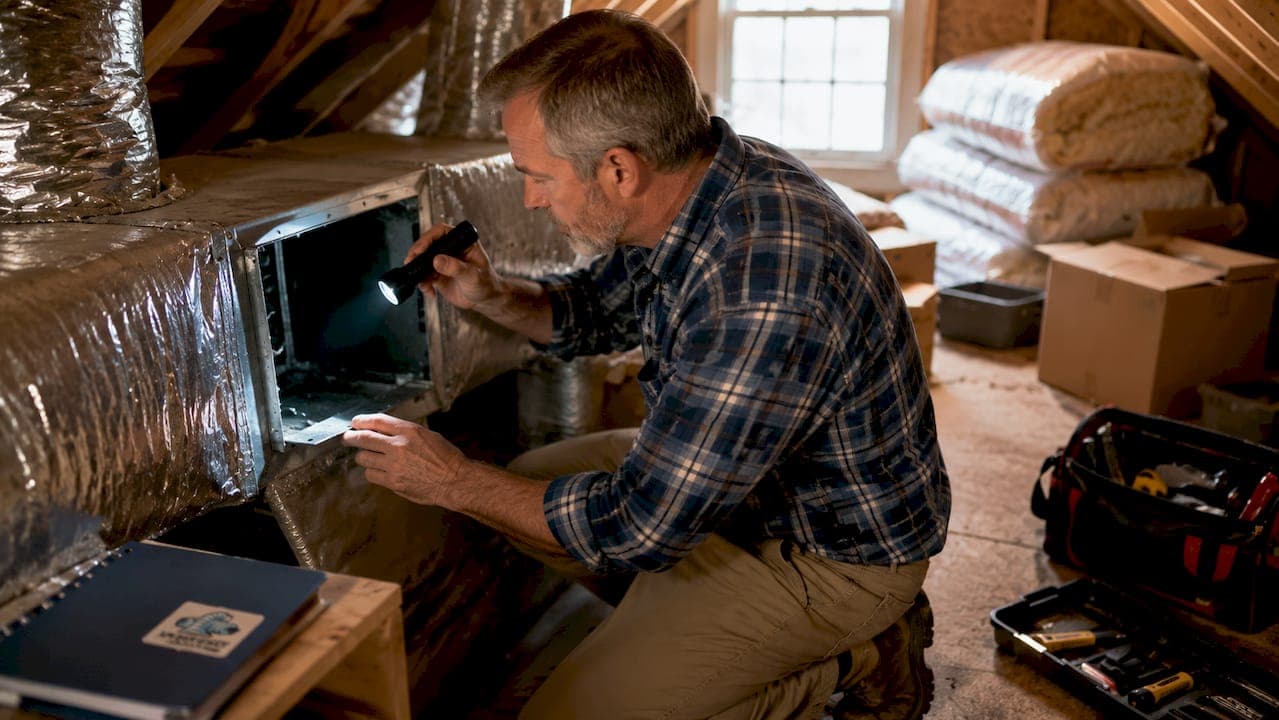
An inspection camera or borescope is the single most important tool in any duct inspection. It lets a technician see inside duct runs without cutting open walls. Modern borescopes connect to tablets or laptops, producing video and still photos that become part of the inspection record. Without one, you are limited to what you can see at register openings, which covers maybe 5% of the duct system.
Access panels and registers are your entry points. Before any inspection begins, locate every accessible panel, return air grille, and supply register in the property. Mapping these locations in advance is what makes repeatable inspections possible. You can return to the same points six months or two years later and make a direct comparison.
Diagnostic instruments
| Tool | What It Measures | Why It Matters |
|---|---|---|
| Duct Blaster Fan | Leakage airflow (CFM25) | Quantifies unintentional air loss |
| Digital Manometer | Pressure differential (Pascals) | Identifies restrictions and imbalances |
| Anemometer | Airflow velocity at registers | Confirms balanced distribution |
| Moisture Meter | Moisture content in duct walls | Flags mold risk before it becomes visible |
A duct blaster pressurizes or depressurizes the system to 25 Pascals and measures how much air escapes through unintentional gaps. The IRC 2018 energy code sets the acceptable leakage threshold at 4 CFM25 per 100 square feet of conditioned floor area. That number gives you a pass/fail benchmark rather than a subjective judgment call.
A digital manometer measures room pressure differentials. Room pressure differences above 3 Pascals indicate supply and return path problems that affect comfort and efficiency. That reading alone can explain why one bedroom in your home is always too hot or too cold.
Pre-inspection checklist
Before any technician arrives, gather the following:
- Recent HVAC service records and filter change dates
- Occupant complaints: odors, uneven temperatures, allergy symptoms
- Known water events: flooding, roof leaks, or plumbing failures near ductwork
- Age of the duct system and any recent renovations
- Location of all access panels, attic hatches, and crawlspace entries
Pro Tip: Write down the specific rooms where occupants notice the strongest odors or worst airflow. That symptom map tells the technician exactly where to focus the camera first.
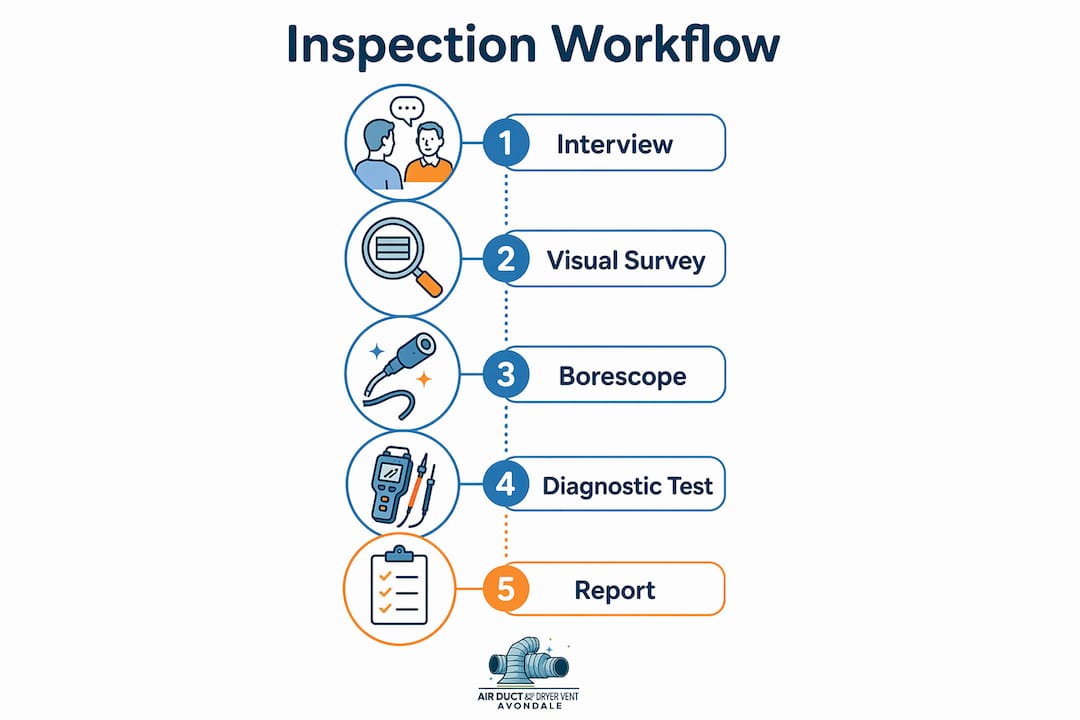
How to conduct the step-by-step duct inspection process
A professional duct inspection workflow follows a consistent sequence: interview, visual survey, camera inspection, quantitative testing, and documentation. Skipping steps produces incomplete data and leads to bad decisions.
Step 1: occupant interview and service history review
Start by asking the occupants about symptoms. Musty smells, visible dust at registers, allergy flare-ups, and rooms that never reach the set temperature are all diagnostic clues. Pull the prior service history to understand what was done and when. A system that had duct cleaning two years ago and now shows the same symptoms needs a different response than one that has never been inspected.
Step 2: visual survey of accessible ductwork
Walk the property and photograph every accessible duct section, register, and return grille. Look for:
- Visible dust buildup at supply and return registers
- Physical damage: crushed flex duct, disconnected joints, or torn insulation
- Moisture stains or rust on metal ductwork
- Gaps at connections where sections meet the air handler
This visual pass takes 20–30 minutes in a typical home. It does not replace camera inspection, but it flags the highest-priority areas before you insert any equipment.
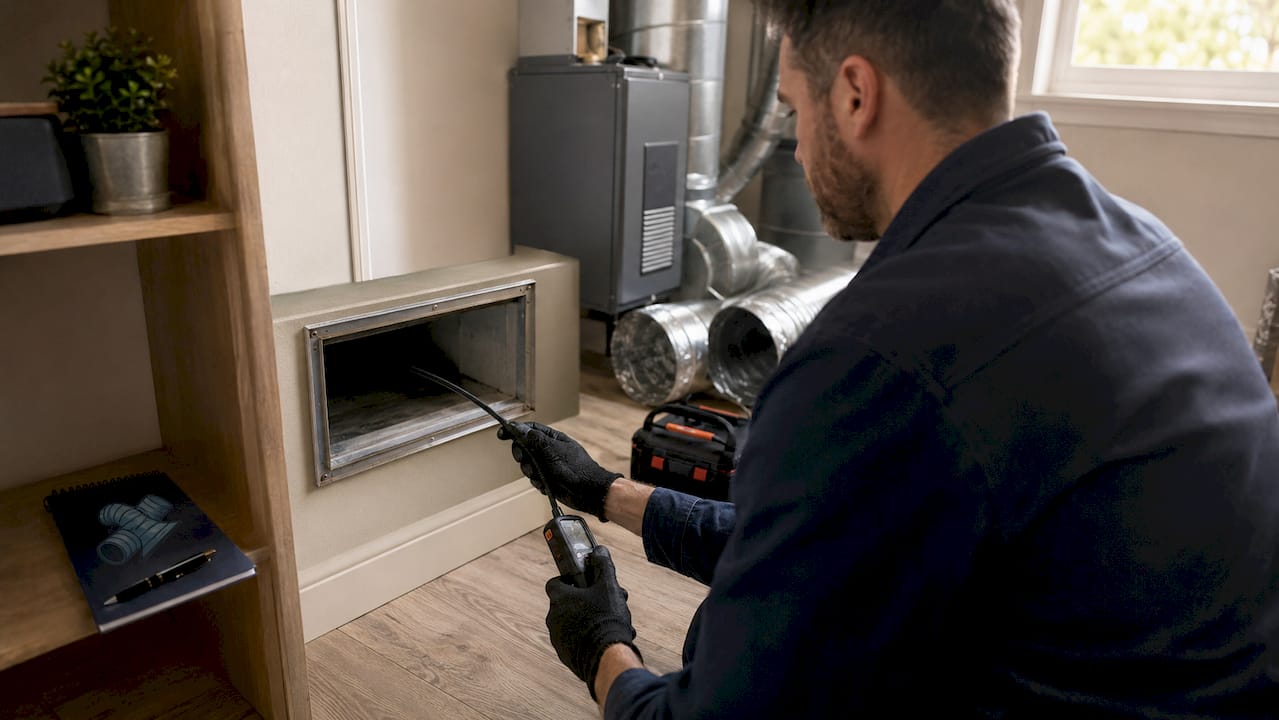
Step 3: borescope camera inspection
Insert the borescope camera through registers and access panels to view duct interiors. Move systematically from the air handler outward, covering both supply and return sides. Capture still photos and short video clips at each location. The goal is to document the actual condition of duct walls, not just the first few inches visible from the register opening.
Focus the camera on elbows, joints, and any section near a past water event. These are the spots where dust accumulates fastest and where mold is most likely to appear. Standardizing your inspection points across visits means you can compare photos from this inspection to photos taken after cleaning, or to photos from the next inspection cycle.
Step 4: quantitative diagnostic testing
This step separates a thorough HVAC ductwork procedure from a surface-level visual check. Run the following tests in sequence:
- Pressure pan test: Hold a pressure gauge over each supply register with the system running. Readings above 1 Pascal suggest leakage in that branch.
- Duct leakage test: Connect the duct blaster to the air handler, seal all registers, and pressurize to 25 Pascals. Record total CFM25 leakage. Divide by conditioned floor area to compare against the 4 CFM25 per 100 sq ft benchmark.
- Room pressure differential: Close interior doors one at a time and measure pressure between rooms. Differences above 3 Pascals confirm supply/return imbalance.
- Airflow measurement: Use an anemometer or flow hood at each register to confirm balanced distribution across the system.
- Static pressure measurement: Measure total external static pressure at the air handler. High readings point to restrictions like undersized ducts, dirty coils, or blocked returns.
Pro Tip: When running the duct leakage test, seal intentional openings like the air handler cabinet and any disconnected flex runs before starting. Unsealed openings skew results and make a leaky system look tighter than it actually is.
Step 5: documentation and baseline report
Compile all photos, video clips, and test readings into a single inspection report. Label each image with its location in the duct map. Record all pressure and airflow numbers alongside the date and system conditions. This baseline report is what makes the next inspection meaningful. Without it, every inspection starts from zero.
How do you interpret inspection results and decide next steps?
Inspection findings fall into three categories: contamination, leakage, and mechanical restriction. Each requires a different response.
Reading contamination findings
Dust accumulation at registers is a proxy indicator, not a definitive trigger for cleaning. The NADCA ACR Standard requires that contamination be confirmed inside the duct system, not just at the register face. A duct inspection checklist should document dust layer thickness on duct walls, presence of debris or biological growth, and moisture staining. Moisture findings carry the most urgency. Wet insulation degrades quickly and creates conditions for mold growth that directly affects indoor air quality.
Leakage thresholds and energy impact
| Finding | Threshold | Recommended Action |
|---|---|---|
| Duct leakage | Above 4 CFM25 per 100 sq ft | Professional sealing with mastic or foil tape |
| Room pressure differential | Above 3 Pascals | Return air path correction |
| Visible mold or moisture | Any confirmed presence | Immediate remediation before cleaning |
| Dust on duct walls | Confirmed by camera | Cleaning per NADCA ACR criteria |
| Insulation damage | Torn, wet, or missing sections | Replacement before system operation |
Leakage above the code threshold means conditioned air is escaping into unconditioned spaces like attics or crawlspaces. That directly raises your energy bill and reduces comfort. The connection between duct leakage and energy costs is direct: every cubic foot of air that leaks out is air your HVAC system has to replace by running longer.
Homeowner screening before professional testing
You do not need a duct blaster to spot obvious problems. Check for air movement around duct joints in accessible areas like attics or basements while the system runs. Feel for warm or cool air escaping at connections. Look for dust streaks on walls near registers, which indicate air bypassing the filter. These observations give you a reason to call a professional before spending money on a full diagnostic.
Condition-based vs. calendar-based triggers
Condition-based inspection triggers include visible dust at registers, musty odors, moisture findings, occupant complaints, or physical duct damage after renovations. A fixed annual schedule ignores these signals and often leads to unnecessary cleanings. The smarter approach is to inspect on condition and clean only when the camera and test data confirm a need.
What are the most common mistakes during duct inspections?
The most common mistake in any duct inspection process is treating visible dirt as the only diagnostic tool. Visible contamination does not reliably indicate airflow problems. A duct can look dusty and still deliver adequate airflow. A duct can look clean and have a 30% leakage rate. Relying on appearance alone leads to cleaning that does not fix the actual problem.
Access and preparation failures
Many inspections produce incomplete results because access points were not identified in advance. Flex duct runs in tight attic spaces, buried return plenums, and sealed access panels all limit camera coverage. Prepare by mapping every access point before the technician arrives. If sections are inaccessible, note them in the report so they can be addressed in future inspections.
Misreading moisture signs
Moisture staining on duct walls does not always mean active mold. It can indicate a past event that has since dried. Use a moisture meter to confirm current moisture levels before recommending remediation. Misidentifying a dry stain as active mold leads to unnecessary and expensive work. Conversely, dismissing a wet section as cosmetic is a serious mistake. Moisture in ductwork directly threatens insulation integrity and creates ongoing air quality risk.
Skipping before-and-after verification
Cleaning without a post-clean inspection is a workflow failure. NADCA's documentation approach requires before-and-after comparisons using the same duct segments and camera angles. Without that comparison, you have no evidence that the cleaning achieved anything. Always request post-clean photos from the same locations documented before the work began.
Pro Tip: When reviewing findings with your HVAC professional, ask them to show you the before-and-after camera images side by side. If they cannot produce both sets, the inspection was incomplete.
- Avoid scheduling cleanings based solely on time elapsed since the last service
- Always confirm mold findings with a moisture meter, not just visual assessment
- Request a written report with photos, not just a verbal summary
- Verify that the technician sealed all intentional openings before running the leakage test
- Check that signs indicating duct cleaning match the camera findings, not just occupant complaints
Key takeaways
A condition-based routine duct inspection workflow, backed by camera documentation and quantitative testing, is the most reliable way to protect HVAC performance and indoor air quality.
| Point | Details |
|---|---|
| Use condition-based triggers | Schedule inspections based on symptoms, moisture, or damage rather than fixed calendar intervals. |
| Quantitative tests are non-negotiable | Duct leakage testing at 25 Pascals and pressure differential readings reveal problems that visual checks miss. |
| Document every inspection point | Standardized camera photos from the same duct segments enable accurate before-and-after comparisons. |
| Moisture findings require immediate action | Wet insulation and moisture staining create mold risk that directly degrades indoor air quality. |
| Post-clean verification closes the loop | A completed workflow always includes post-clean camera inspection to confirm the cleaning was effective. |
Why condition-based inspections changed how i think about duct health
I used to believe that annual duct cleaning was the responsible thing to do. It felt proactive. After years of seeing inspection reports, I changed my mind completely. The data tells a different story. Systems in dry climates with good filtration can go three or four years without meaningful contamination. Systems near construction zones or in humid climates can need attention in under twelve months. A calendar does not know the difference.
The shift to condition-based inspections is the single biggest improvement in how this industry approaches duct maintenance. It forces the technician to produce evidence before recommending work. That protects homeowners from unnecessary spending and gives property managers a defensible paper trail for every decision.
What I find most underused is the homeowner's own role between professional visits. A quick check of your registers for dust buildup, a sniff test for musty odors after the system kicks on, and a look at your filter every 30 days costs nothing. Those simple observations are often the first signal that something has changed inside the duct system. Catching it early means a smaller problem and a lower repair bill.
The other thing I want homeowners to understand is that inspecting duct insulation is not optional. Damaged insulation in an attic duct run can add hundreds of dollars a year to your energy bill without producing any visible symptom at the register. It only shows up in the camera footage and the energy bill. That is exactly why a thorough workflow covers insulation condition alongside contamination and leakage.
The professionals who do this work well are the ones who bring data, not just a vacuum truck. Ask for the numbers. Ask for the photos. If the answer is vague, keep asking.
— Shaun
How professional duct cleaning supports your inspection workflow
A thorough ventilation system audit only delivers results when the cleaning that follows it meets the same standard as the inspection.
Airanddryerventcleaningavondale provides NADCA-aligned professional air duct cleaning for residential and commercial properties in Avondale, Arizona. Every service includes documented before-and-after camera inspection, so you get the verification evidence your workflow requires. For property managers handling multiple units, the commercial duct cleaning service includes inspection records suitable for compliance tracking and asset management. If your inspection findings point to air quality concerns, Airanddryerventcleaningavondale also offers indoor air quality testing to confirm what the duct camera cannot measure. Schedule your inspection today and get the data your HVAC system deserves.
FAQ
What is a routine duct inspection workflow?
A routine duct inspection workflow is a systematic process that includes occupant interviews, visual surveys, borescope camera inspection, and quantitative tests like duct leakage and pressure measurements. It follows standards like the NADCA ACR to determine whether cleaning or repairs are needed based on actual conditions.
How often should you inspect residential ductwork?
Inspection frequency should be condition-based rather than calendar-based. Triggers include musty odors, visible dust at registers, moisture findings, occupant health complaints, or physical duct damage following renovations.
What does duct leakage testing measure?
Duct leakage testing pressurizes the system to 25 Pascals and measures airflow escaping through unintentional gaps, expressed as CFM25. The IRC 2018 energy code sets the acceptable limit at 4 CFM25 per 100 square feet of conditioned floor area.
Can a homeowner inspect their own ducts?
Homeowners can perform a basic DIY vent inspection by checking registers for dust buildup, feeling for air leaks at accessible duct joints, and noting odors or uneven temperatures. Full camera and leakage testing requires professional equipment and training.
What triggers the need for duct cleaning after an inspection?
Cleaning is warranted when camera footage confirms contamination on duct walls, when moisture or mold is present, or when occupant symptoms correlate with documented duct conditions. Visible dust at registers alone is not sufficient justification under NADCA ACR criteria.