TL;DR:
- Wiping mold from vents without proper precautions can spread spores and worsen indoor air quality. The EPA recommends professional remediation for HVAC mold issues, especially if contamination is inside ductwork. Regular inspections, moisture control, and expert cleaning are vital to prevent mold recurrence and protect occupant health.
You spot dark, fuzzy patches around an air vent in your Avondale home or office. Your first instinct might be to grab a rag and wipe it away. That impulse is understandable, but wiping mold from a vent without proper precautions can actually scatter millions of invisible spores straight into your air supply and throughout your entire building. This guide walks you through everything you need to know: how to assess the problem correctly, what you can safely handle yourself, when you absolutely must call in a professional, and how to make sure the mold never comes back.
Table of Contents
- Understanding mold in vents: why prompt, safe action matters
- Essential tools, safety equipment, and when you need a professional
- Step-by-step guide: how to remove mold from vent covers safely
- Signs you need professional mold remediation
- Preventing future mold in HVAC systems
- Why we always recommend expert assessment for mold issues in vents
- Professional mold removal and air quality solutions in Avondale
- Frequently asked questions
Key Takeaways
| Point | Details |
|---|---|
| Turn off HVAC if mold is found | Running a moldy system can spread spores and worsen contamination. |
| DIY is limited to small, surface-only areas | If mold is inside the HVAC or recurs, hire a professional to avoid health and property risks. |
| Containment and safety gear are essential | Always use proper protection, cleaning supplies, and contain the work area to prevent spread. |
| Fix the source of moisture | Permanent mold removal requires ending leaks and controlling humidity in your home or business. |
| Professional help protects air quality | Trained technicians ensure thorough cleaning, safe removal, and lasting indoor air quality improvements. |
Understanding mold in vents: why prompt, safe action matters
Mold needs two things to thrive: a food source and moisture. Your HVAC ductwork gives it both. Dust, dead skin cells, and debris collect inside ducts over time, and the slightest humidity imbalance turns that debris into a buffet for mold colonies. In Arizona, the late summer monsoon season drives up indoor humidity fast, especially when doors and windows are opened frequently. Even without monsoon moisture, poorly insulated ductwork can develop condensation whenever cold conditioned air meets warm attic temperatures.
Here are the most common moisture hotspots inside a vent system:
- Supply and return vent covers where warm room air contacts cold metal
- Drain pans and coil housings inside the air handler where standing water collects
- Flex duct joints and seams where condensation pools if insulation is damaged
- Areas near bathroom or kitchen exhaust connections where humid air can backflow
The health risks are not minor. Mold spores irritate the nose, throat, and lungs even in healthy adults. In children, elderly residents, or anyone with asthma, allergies, or a compromised immune system, exposure can trigger serious respiratory reactions. Some mold species produce mycotoxins, compounds that cause headaches, fatigue, and neurological symptoms over time. If your HVAC system is running while mold grows inside, every cycle pushes contaminated air through every room simultaneously.
"For mold in HVAC systems and vents, the EPA advises professionals experienced with HVAC remediation and recommends not running the HVAC system if you suspect it is contaminated."
That single piece of guidance changes everything. It means your first move after spotting vent mold is not to clean, it is to turn the system off and assess. Spreading mold spores throughout your property is far worse than leaving the mold in place temporarily while you form a proper plan. You can learn more about preventing this scenario entirely by reviewing HVAC mold prevention tips before a problem even starts.
Essential tools, safety equipment, and when you need a professional
Knowing the risk is one thing. Knowing who should actually do the work is another. The answer depends heavily on where the mold is and how much of it you can see.
According to EPA residential mold guidance, smaller mold areas of roughly under 10 square feet may be manageable as a DIY project with proper equipment and precautions. However, if HVAC contamination inside the ductwork itself is suspected, you should not run the system and should consult professional duct cleaning guidance immediately.
Here is a simple comparison to help you decide:
| Situation | DIY possible? | Professional required? |
|---|---|---|
| Small mold spots on vent cover only | Yes, with PPE | Recommended for thorough job |
| Mold smell but nothing visible | No | Yes |
| Visible mold inside the duct opening | No | Yes |
| Mold returns within weeks of cleaning | No | Yes |
| Anyone in building has respiratory issues | No | Yes |
| Large affected area (over 10 sq ft) | No | Yes |
When mold is present inside the actual ductwork, the stakes go up dramatically. Ducts run through walls, ceilings, and attic spaces. A DIY attempt without professional containment equipment will almost certainly push spores into areas you cannot reach or clean. That is how a manageable surface problem turns into a property wide contamination.
Basic tool checklist for safe DIY vent cover cleaning:
- N95 or better respirator mask
- Safety goggles (not just glasses)
- Nitrile gloves, at least two layers
- Old clothes you can wash immediately or dispose of
- Plastic drop cloths to seal off the work area
- Spray bottle with detergent solution or EPA-registered mold cleaner
- Stiff bristled scrub brush
- HEPA vacuum if available
- Trash bags rated for hazardous materials
Pro Tip: Never use bleach on porous materials or inside ductwork. Bleach kills surface mold but does not penetrate porous surfaces, and the fumes in an enclosed duct system can be dangerous. An EPA-registered mold remover or a detergent and water solution works better and safer for vent covers.
The moment you notice mold odor without visible mold, recurring mold after cleaning, or dark staining inside the duct opening itself, stop immediately. Check the signs you need duct cleaning to understand whether what you are seeing goes beyond a surface issue. If it does, Avondale duct cleaning services are the right call before any further DIY action. You can also review DIY duct cleaning tips for guidance on safe scope limits.
Step-by-step guide: how to remove mold from vent covers safely
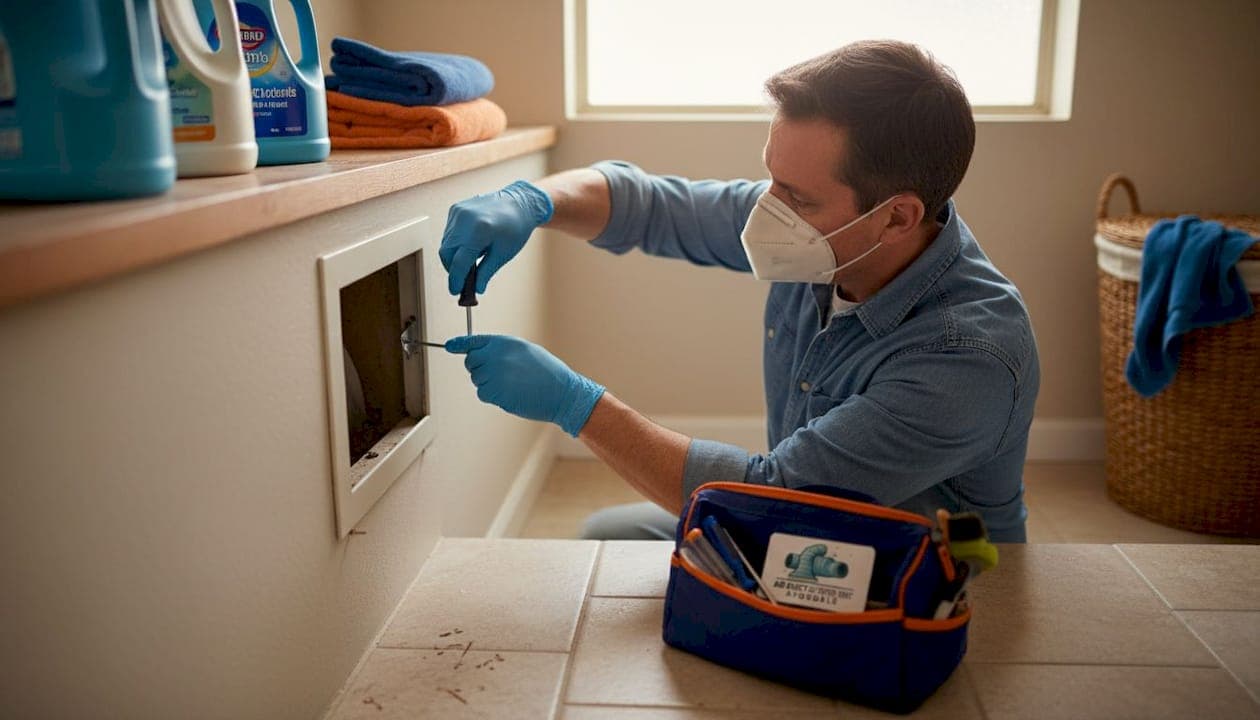
If you have confirmed the mold is limited to the vent cover surface and the area is small, here is how to handle it safely and thoroughly. Follow each step in order. Skipping steps is where most DIY mold jobs go wrong.
-
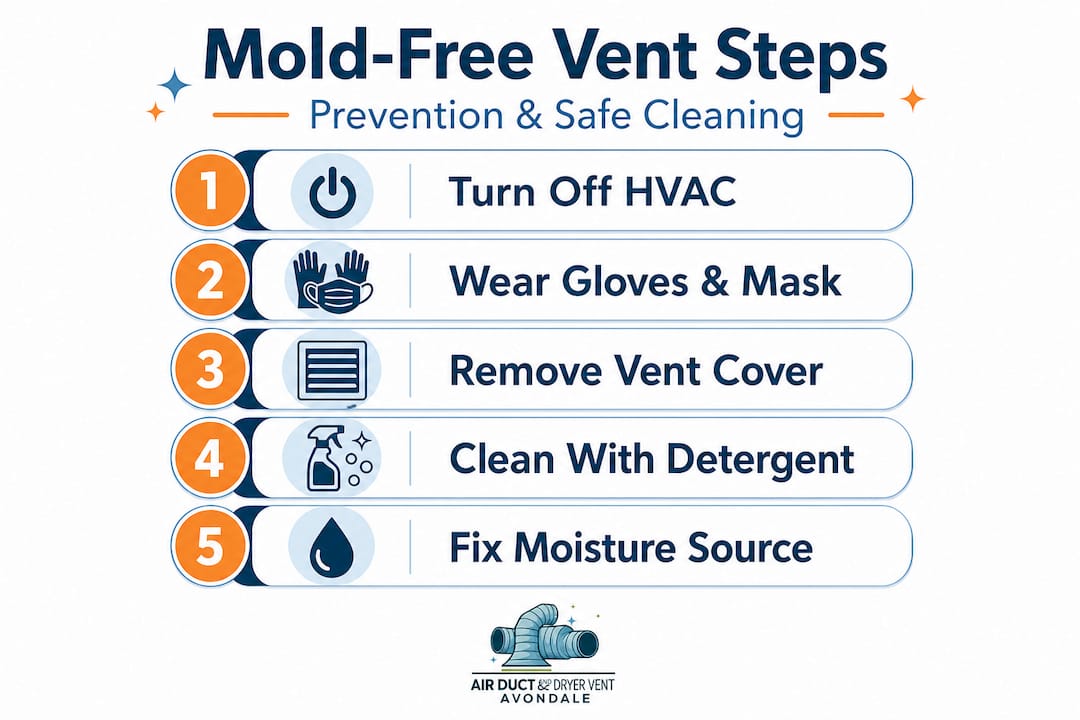
Turn off your HVAC system completely. Do not just set it to fan mode. Power it down at the thermostat and, ideally, at the breaker. This prevents air circulation from spreading spores during the cleaning process. Remember, EPA guidance confirms that HVAC area containment and negative pressure with HEPA vacuuming are core mechanics of proper mold remediation, even at small scales.
-
Put on all personal protective equipment (PPE) before touching anything. That means your respirator, goggles, gloves, and old clothing. Mold spores become airborne the moment you disturb them, so your protection needs to be in place first.
-
Seal off the work area. Tape plastic drop cloths over any doorways leading to other rooms. This limits spore migration. If you have a portable air purifier with a HEPA filter, run it in the room during the process.
-
Carefully remove the vent cover. Most covers are held by two screws. Loosen them slowly. Do not shake or drop the cover, as that will dislodge spores. Place it directly into a plastic bag temporarily if it is small enough.
-
HEPA vacuum the vent cover and the surrounding vent opening. If you have access to a HEPA vacuum, use it to pull loose spores from the cover and the visible duct interior before applying any liquid. This step dramatically reduces the spore count in the air.
-
Apply your cleaning solution. Mix a few drops of dish detergent in warm water, or use an EPA-registered mold cleaner per the product label. Spray or wipe it onto the mold affected areas of the vent cover. Let it sit for five to ten minutes.
-
Scrub gently with a stiff brush. Work in one direction to avoid spreading contaminated material. Rinse with a clean damp cloth. Repeat until no visible mold remains.
-
Dry everything completely before reinstallation. Mold returns where moisture stays. Use a clean dry cloth and allow the cover to air dry in a well ventilated space for at least 30 minutes. Never reinstall a damp cover.
-
Dispose of all materials safely. Every cloth, drop cloth, brush, and glove goes into a sealed trash bag before leaving the work area. Tie it closed and remove it from the home immediately.
-
Monitor over the next two to four weeks. Check the vent weekly. If mold returns, that is a strong signal of an underlying moisture source you have not addressed.
Here is a quick reference for cleaning solutions and their appropriate uses:
| Cleaning agent | Best for | Avoid using on |
|---|---|---|
| Detergent and warm water | Non-porous metal covers | Porous drywall, wood |
| EPA-registered mold remover | Most hard surfaces | Unventilated spaces |
| Hydrogen peroxide (3%) | Small surface spots | Large infected areas |
| Bleach solution | Not recommended for vents | Porous materials, enclosed spaces |
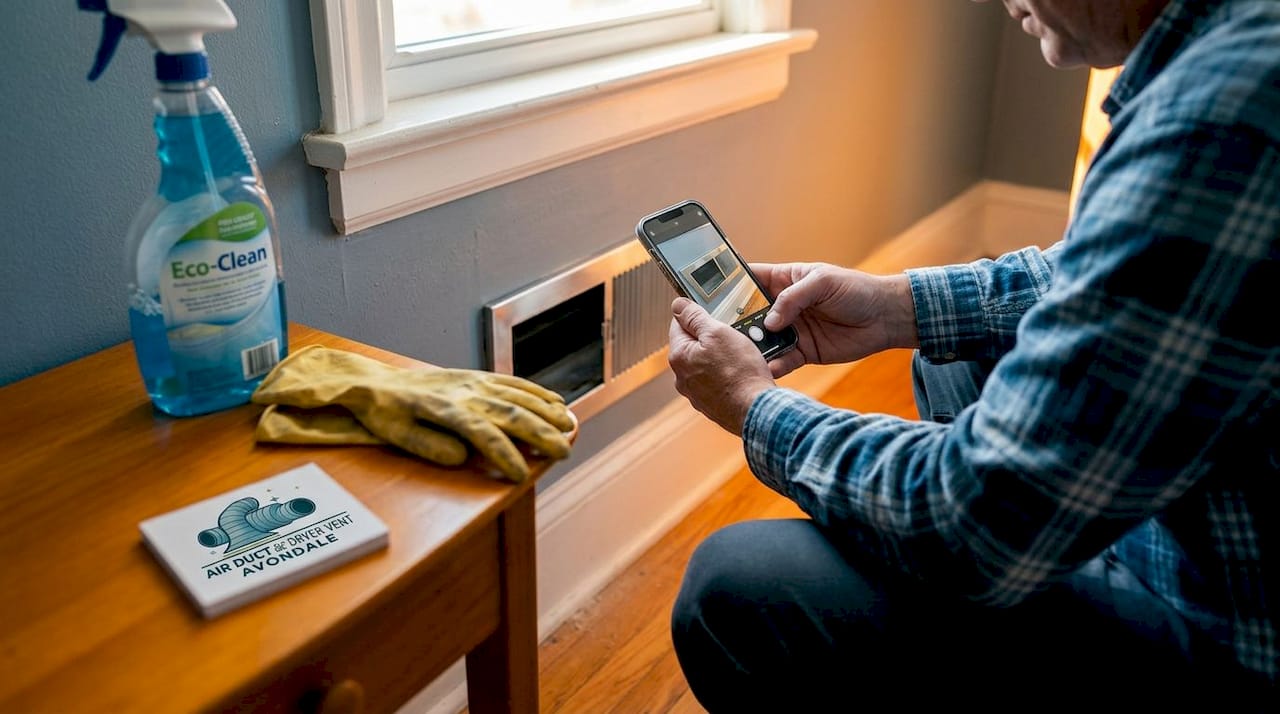
Pro Tip: Take photos before and after cleaning. If mold returns and you eventually need professional remediation, those photos give the technician valuable information about the growth rate and pattern, which helps identify the moisture source faster.
According to EPA guidance on mold and moisture, fixing the underlying moisture source is not optional. If you clean the mold without addressing leaks, condensation, or drainage problems, it will return within weeks every single time. Review the vent cleaning workflow and the vent cleaning process for a broader picture of what a thorough job looks like from start to finish.
Signs you need professional mold remediation
Most homeowners and business owners who attempt a DIY mold cleanup feel confident after wiping down a vent cover. Then, three weeks later, the smell is back. Sometimes it is worse. This pattern is one of the clearest signs that the problem is bigger than the surface.
Here are the warning signs that mean you need professional help, not a stronger cleaning product:
- Persistent mold odor after cleaning. A musty smell that lingers or returns quickly means active mold growth is still happening somewhere in the system.
- Visible mold inside the duct opening. Even a small visible patch just inside the duct is a sign of deeper colonization throughout the ductwork.
- Large affected area. Anything approaching or exceeding 10 square feet requires professional containment and removal methods.
- Chronic symptoms in building occupants. Ongoing coughing, sneezing, headaches, or fatigue that improves when people leave the building and returns when they come back is a red flag for systemic mold exposure.
- Recurring mold after cleaning. If mold reappears in the same spot within two to four weeks, there is an active moisture source feeding it that you have not found.
- Water damage history. Roof leaks, flooding, or plumbing breaks that affected areas near ductwork raise the probability of deep mold contamination significantly.
"If you suspect mold inside the HVAC system and not just on a vent cover, the EPA recommends professional HVAC-experienced remediation and immediate HVAC shutoff."
Professional remediators bring tools and techniques that simply are not available at a hardware store. They establish negative air pressure zones, meaning they use powerful air movers to ensure contaminated air flows outward and is filtered rather than spreading into clean areas. They use commercial grade HEPA vacuums capable of capturing particles as small as 0.3 microns. They can scope inside ducts with cameras to document the extent of contamination before and after remediation.
Avondale businesses have additional concerns. A commercial building circulates air across far more square footage than a residence, meaning mold in one part of the duct system can affect employees, customers, or clients throughout the entire facility. Check the key duct cleaning signs for a business setting and consider whether professional duct cleaning or commercial duct cleaning is the right next step for your property.
Preventing future mold in HVAC systems
Removing existing mold is only half the job. The other half is making sure it does not come back. Prevention is always cheaper than remediation, and in Avondale's climate, a little vigilance goes a long way.
Core prevention habits that actually work:
- Inspect your HVAC system every season. Look for standing water near the air handler, rust stains on ductwork, or condensation on supply registers. These are early warning signals.
- Change your air filter on schedule. A clogged filter forces the system to work harder, reduces airflow, and allows moisture to sit longer inside ducts. Most residential systems need a new filter every 30 to 90 days depending on filter type and household conditions.
- Fix any leaks or drainage issues immediately. A slow drip from a pipe near a duct is a mold incubator. Do not wait for your next scheduled maintenance visit.
- Keep indoor humidity between 30 and 50 percent. The EPA confirms that moisture control is the single most effective mold prevention strategy. Use a portable hygrometer to monitor your home or office.
- Schedule professional inspections annually. A trained technician can catch problems you will not notice: hairline cracks in duct seams, deteriorating insulation, and slightly clogged drain pans before they become full mold events.
- Ensure bathroom and kitchen exhaust fans vent outside. If they exhaust into the attic or into ductwork, they introduce humid air directly into the system.
Pro Tip: After every monsoon season in Avondale, do a quick visual check of all your vent covers. Look for discoloration, dark spotting, or any musty smell when you hold your hand near the vent. Catching moisture damage in September is far better than discovering mold in your ducts by January. Regular HVAC mold prevention and a consistent regular vent cleaning schedule are what separate properties that never have mold problems from those that deal with repeat issues year after year.
Why we always recommend expert assessment for mold issues in vents
Here is something we see constantly in Avondale: a homeowner wipes down a vent cover, feels confident the problem is solved, and calls us three months later with a mold problem twice as bad as the original. It is not because they did not try. It is because the visible mold on the cover was a symptom, not the source.
In our experience, recurring mold almost always traces back to one of three root causes that are invisible from the outside: a clogged drain pan holding standing water near the coil, a micro crack in a duct seam allowing attic humidity to enter, or a section of flex duct with failed insulation creating a consistent condensation zone. None of these are visible to someone who is just cleaning a vent cover. All of them require tools and access that the average property owner simply does not have.
The uncomfortable truth about DIY mold cleanup in HVAC systems is that incomplete removal is often worse than no removal at all. When you disturb mold without proper containment, you aerosolize spores that settle in new locations inside your ductwork. You have cleaned the original colony but seeded several new ones. The problem does not just come back, it spreads.
We are not saying you should never do any maintenance yourself. For surface spots on vent covers with no deeper system involvement, a careful DIY clean is reasonable. But we have seen too many cases where the money saved on a professional inspection upfront became thousands of dollars in remediation costs three seasons later. An expert assessment is not just about cleaning mold. It is about finding why it grew there, and making sure it cannot use that same pathway again. The team at our HVAC experts does exactly that: document the moisture pathway, eliminate the source, and clean the system so the problem is resolved at the root, not just at the surface.
Professional mold removal and air quality solutions in Avondale
Dealing with mold in your HVAC vents is stressful, and you do not have to navigate it alone. If anything in this guide raised a flag about the condition of your system, now is the time to act before small surface mold becomes a deep system problem.
At Air Duct and Dryer Vent Cleaning Avondale, we offer a full range of services designed specifically for homeowners and business owners who need real solutions: air vent cleaning with professional containment, indoor air quality testing to confirm what is actually in your air, dryer vent cleaning, duct repairs, and full HVAC system assessments. We work around your schedule, including after-hours appointments, and we back our work with service warranties. If you are in Avondale and you want peace of mind about what your family or employees are breathing, reach out today and let us take a look.
Frequently asked questions
Is it safe to clean mold from HVAC vents yourself?
Cleaning small mold spots on vent covers can be safe when you use proper PPE and follow EPA guidelines, but suspected HVAC contamination inside the duct system should always be handled by certified professionals to prevent spreading spores throughout your property.
What are the health risks if I ignore mold in vents?
Mold in HVAC vents circulates spores through your entire building with every air cycle, causing respiratory problems, allergies, and asthma attacks, and the EPA recommends professionals for any suspected internal HVAC contamination to protect occupant health.
Why should the HVAC system be turned off when mold is found?
Running a system with suspected mold contamination pushes spores into every room simultaneously, and EPA guidance is explicit that shutting down the HVAC is a required first step before any remediation begins.
How can I prevent mold from coming back in my vents?
Fix leaks immediately, keep indoor humidity between 30 and 50 percent, replace filters on schedule, and schedule annual professional inspections, because ongoing moisture sources are always the root cause of recurring mold in HVAC systems.
How do professionals remove mold from HVAC systems?
Certified remediators use containment barriers, negative air pressure, and HEPA vacuuming techniques recommended by the EPA to eliminate mold colonies safely without spreading spores to unaffected areas of the building.