TL;DR:
- Replacing damaged or poorly fitted vents improves airflow, reduces energy costs, and enhances indoor air quality in Avondale homes. Proper measurement, inspection, and sealing are crucial steps, often requiring professional assistance for best results. Regular maintenance and system checks ensure lasting comfort, efficiency, and health benefits.
If you've noticed one room in your Avondale home feeling like a furnace while another stays ice cold, your vents are likely part of the problem. Old, damaged, or poorly sized vents force your HVAC system to work harder, raise your energy bills, and push dust, allergens, and moisture through your living spaces every single day. This guide walks you through every stage of vent replacement, from gathering the right tools to testing your results, so you can breathe easier and spend less on cooling costs starting this season.
Table of Contents
- Why replace vents: Key benefits for your Avondale home
- What you need: Tools, parts, and preparation
- Step-by-step process: How to replace your air vent
- After installation: Testing, troubleshooting, and ongoing maintenance
- Our expert take: Vent replacement pitfalls most guides skip
- Need professional help? Avondale's vent and duct experts are ready
- Frequently asked questions
Key Takeaways
| Point | Details |
|---|---|
| Replace damaged vents | Old or blocked vents undermine comfort and energy efficiency in your home. |
| Measure ducts, not covers | Accurate duct size measurement ensures a proper fit and avoids air leaks. |
| DIY for basics, pros for ductwork | Swapping grilles is easy, but deeper repairs or boot replacements need an expert. |
| Energy and air savings | Upgrading vents often improves air quality and lowers bills by up to 40 percent. |
Why replace vents: Key benefits for your Avondale home
Before getting started, understand why vent replacement makes such a noticeable difference in Avondale homes.
Most homeowners think about vent replacement as a cosmetic upgrade. New grille, cleaner look, done. But the real payoff goes much deeper than appearances. In a city like Avondale, where your HVAC system runs hard for seven or eight months of the year, even small airflow restrictions add up to serious energy waste and indoor air problems.
Balanced temperatures and better HVAC efficiency
When vents are bent, clogged with old debris, or simply the wrong size, your system struggles to push conditioned air where it needs to go. The blower motor compensates by running longer, which means higher electricity bills and more wear on expensive components. Replacing restricted or damaged vents reduces HVAC system resistance, shortens run times, improves even temperature distribution, and supports energy efficiency without requiring a full system replacement.
Think of it like a garden hose with a kink in it. The water pressure at the source doesn't change, but far less water reaches the nozzle. Replacing a restricted vent removes that kink and lets airflow reach every corner of your home the way it was designed to.
Real energy savings you can measure
The numbers are more compelling than most people expect. Smart vents save 15 to 40% on conditioning costs in homes with unbalanced airflow, while duct sealing alone saves 10 to 20%. For an average Avondale household running central air most of the year, that kind of reduction makes vent upgrades one of the fastest-payback home improvements available.
- Standard vent replacement: Reduces pressure drop and improves flow immediately
- Smart vent systems: Redirect airflow based on room occupancy and temperature sensors
- Pairing with duct sealing: Compounds savings by addressing leaks alongside restricted registers
- Return air upgrades: Prevent pressure imbalances that cause doors to slam and rooms to stay stuffy
Here's a quick look at the vent replacement benefits most homeowners notice within the first week: fewer hot spots, quieter HVAC operation, and noticeably fresher indoor air.
Energy savings snapshot: Homes in Arizona's high-cooling climate that combine quality vent upgrades with HVAC system improvements see overall savings of 20 to 30% on conditioning costs.
Health and air quality improvements
Beyond comfort and cost, vent condition directly affects what you breathe. Damaged vents with gaps or rust allow dust, mold spores, and outside particles to bypass your filter and enter your living space. Understanding how ducts and air quality interact shows why vents are the first place to look when allergy symptoms spike indoors. A simple replacement removes these entry points and gives your filtration system a clean start.
What you need: Tools, parts, and preparation
With the benefits clear, here's what you'll need to get started.
Walking into a hardware store without a clear plan is how homeowners waste two hours and still come home with the wrong parts. Preparation here is everything, especially because Avondale's climate adds specific demands that don't apply in cooler states. You want metal over plastic whenever possible, because plastic registers warp and crack faster in Arizona's heat cycles.
Essential tools for the job
- Tape measure (for duct opening, not the old grille)
- Flathead and Phillips screwdrivers
- Utility knife for old sealant or caulk removal
- Flashlight or headlamp for attic and floor duct inspection
- Metal snips (for minor duct boot adjustments)
- Foil HVAC tape and mastic sealant
- Vacuum with hose attachment
Pro Tip: Always prepare for vent replacement by measuring the duct opening, not the decorative cover sitting over it. This is the single most common sizing mistake, and buying the wrong size register sends you back to the store every time.
DIY vs. professional parts comparison
| Component | DIY-friendly | Requires a pro |
|---|---|---|
| Decorative registers | Yes | No |
| Adjustable floor grilles | Yes | No |
| Duct boots (rusted or damaged) | No | Yes |
| Return air grilles (standard swap) | Yes | No |
| Smart vent systems with sensors | Partial | Recommended |
| Flex duct connections at boot | No | Yes |
| Attic duct repairs | No | Yes |
In older Avondale homes, undersized returns or leaky attic ducts can completely undermine a vent replacement project. Before you buy anything, shine a flashlight into the duct boot. Look for orange rust, visible gaps, or disconnected flex duct. If you find serious damage, a professional needs to address the boot or duct section before you install a new grille over the top.
Critical measurements and material choices
Measure the duct opening precisely, as the most common error is measuring the cover. Standard duct openings range from 4x10 inches to 6x12 inches for supply registers in residential homes. Write down both dimensions before leaving for the store. Also note whether the vent is floor-mounted, wall-mounted, or ceiling-mounted, since each position has different register styles and louver angles designed for proper airflow direction.
For Avondale specifically, metal registers outperform plastic ones in heat and dust resistance. Choose steel or aluminum with a powder-coated finish. They cost a few dollars more per register, but they won't yellow, crack, or warp during summer temperature swings.
Step-by-step process: How to replace your air vent
Once you're ready, follow these steps for a smooth and successful vent replacement.
This process applies to the most common scenario: replacing a standard floor or wall supply register. Ceiling registers follow the same logic but require a ladder and a helper for larger sizes.
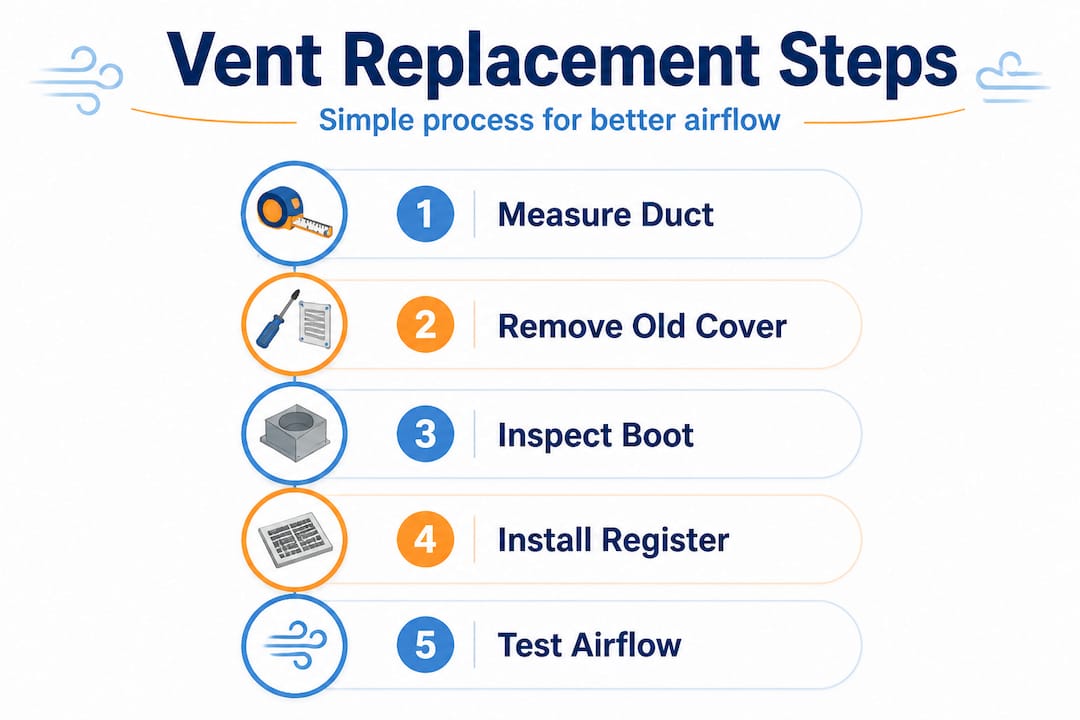
Step-by-step replacement walkthrough
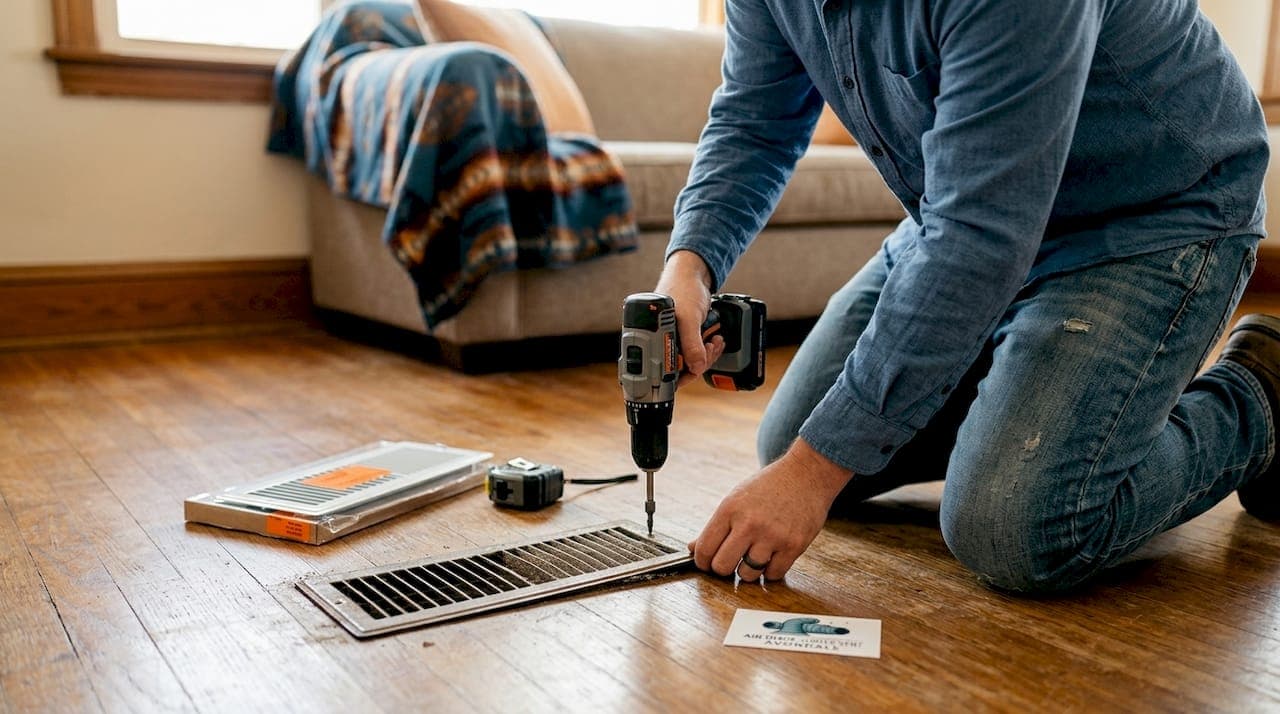
- Turn off your HVAC system. Don't skip this. Dust and debris loosened during removal can get pulled into the system if the blower is running.
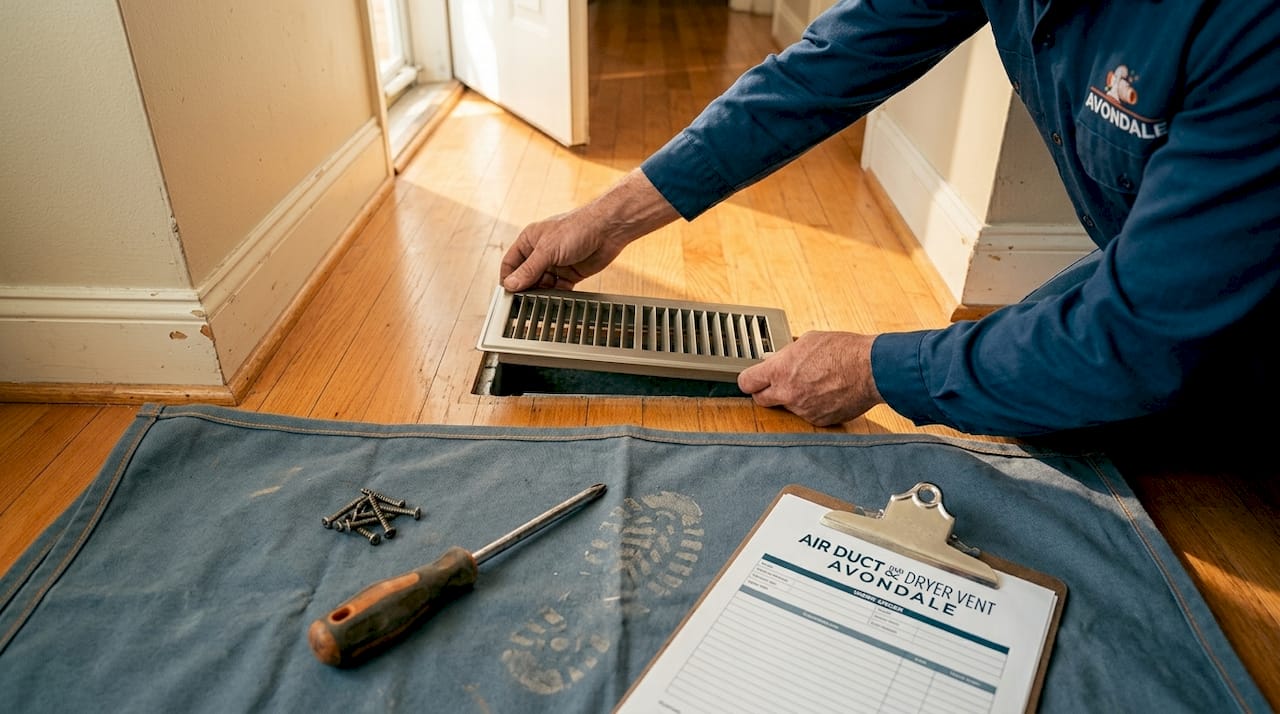
- Remove the old register. Most unscrew with a flathead or Phillips screwdriver. Some older registers just lift out or have clips on the sides. Set screws aside somewhere you won't lose them.
- Inspect the duct boot. Reach in with a flashlight. Check for rust, disconnected flex duct, or debris buildup. If the boot looks good, proceed. If it's damaged, stop and call a pro before continuing.
- Vacuum out the duct opening. Use a hose attachment to pull out dust, insulation fibers, and any debris within reach. This is important for air quality and helps you see the boot condition clearly.
- Apply foil HVAC tape to gaps around the boot. If you see any small gaps between the boot and the floor or wall, seal them now with foil tape or mastic sealant. This prevents conditioned air from leaking into wall cavities.
- Insert the new register. Align the screw holes, press the register flush, and tighten screws snugly. Don't overtighten on plaster or drywall surfaces.
- Open the louvers to test airflow. Hold your hand over the register after turning the system back on. You should feel consistent, directed airflow within a minute or two.
- Check for whistling or rattling sounds. These mean the register is either loose or too small for the duct opening. Tighten screws or verify sizing.
Safety note: Watch for sharp metal edges when reaching into duct boots. Old sheet metal can have burrs that cut easily. Wear gloves and use a flashlight before reaching into any opening. Also check that no electrical wiring runs close to floor vent areas before cutting or drilling anything.
Typical timelines for each approach
| Task | DIY time estimate | Professional time estimate |
|---|---|---|
| Single register swap | 15 to 30 minutes | 10 to 15 minutes |
| Full home register replacement (10 vents) | 3 to 5 hours | 1 to 2 hours |
| Boot replacement (1 location) | Not recommended | 1 to 2 hours |
| Smart vent installation (per room) | 45 to 60 minutes | 30 to 45 minutes |
Smart vents: When they're worth it and when they're not
Smart vents and source control work best together, and the EPA points out that ventilation upgrades alone don't solve air quality problems if the source of pollutants isn't addressed. Smart vents make the most sense for homes with a dedicated room that's rarely used, a bonus room over a garage, or a bedroom with chronic temperature complaints. If your ductwork is already balanced and sized correctly, the payoff from smart vents drops considerably.
Pro Tip: After installation, use a stick of incense or a tissue near the register to visualize airflow direction. The smoke or tissue movement tells you instantly whether air is actually reaching the room or getting lost in the duct system. Pair this with regular clean vents for air quality maintenance to keep the system performing at its best.
After installation: Testing, troubleshooting, and ongoing maintenance
Proper installation is only the beginning. Testing and maintenance keep your home air healthy and efficient for years.
A lot of homeowners install new vents, flip the thermostat back on, and consider the job done. That's a mistake. The testing phase is what tells you whether your work actually improved things or just gave the problem a fresh coat of paint.
Post-installation checklist
- Walk to every replaced vent and confirm airflow is present and directional
- Hold a thermometer at vent height in each room and compare readings to the thermostat setpoint
- Listen for whistling (undersized register or poorly seated fit), rattling (loose screws), or no airflow at all (blocked duct or closed damper inside)
- Check that all register louvers move freely and hold their set position
- Confirm no dust or debris is coming through the new registers during the first few minutes of operation
Common problems and fixes
Whistling after installation: Almost always a sizing issue or a register that's slightly smaller than the duct opening, which creates turbulence at the edges. Double-check your measurements and, if needed, use a slightly larger register with an overlapping flange.
No change in airflow: The problem may not be the register at all. Closed dampers inside the duct, collapsed flex duct in the attic, or an undersized return air grille elsewhere in the home can all cause this. Cleaning vents after work and inspecting the duct path are the next steps.
Rooms still uneven in temperature: This often means the duct system itself has leaks or imbalances that a register swap can't fix on its own. Whole-system duct testing by a professional will identify where the real losses are occurring.
"Professionals can test for hidden leaks or imbalances missed during DIY installs, using pressure testing equipment that accurately maps where your conditioned air is actually going." This matters because a home can have a dozen perfectly installed registers and still lose 20 to 30% of its conditioned air through leaky ductwork before it ever reaches the living space.
Ongoing maintenance habits that protect your investment
Upgrading vents for comfort works best when paired with a regular maintenance routine. New registers don't stay clean forever, especially in Avondale where dust and pollen cycles are intense. Here's what to build into your schedule:
- Monthly: Visually check registers for dust buildup and wipe down with a damp cloth
- Every 3 months: Remove registers and vacuum the first few inches of each duct opening
- Annually: Schedule a professional air duct inspection to check for leaks, debris, and moisture issues
- After any renovation: Have vents improved indoor air quality maintenance performed, since construction dust contaminates duct systems rapidly and undermines all your replacement work
The combination of well-fitted registers and a clean duct system is what produces lasting comfort and genuine energy savings. Neither piece works as well without the other.
Our expert take: Vent replacement pitfalls most guides skip
To ensure your hard work pays off, let's share what we've learned from years in the field, mistakes to avoid that most guides never mention.
Most DIY vent guides focus on the easy part: unscrew the old one, screw in the new one. What they don't tell you is where things go wrong in real homes, especially in Avondale where we've seen the same mistakes repeated across hundreds of service calls.
Mistake 1: Measuring the wrong thing
The biggest single error we see is homeowners measuring the old decorative cover instead of the actual duct opening. The cover is almost always larger than the duct, sometimes by an inch or more on each side. When you order a replacement based on cover size, you end up with a register that's too big to seat properly or one that leaves gaps around the edges. Always measure the inside of the duct opening, width first, then height.
Mistake 2: Ignoring the duct boot
You can install a brand new register over a rusted, leaking duct boot, and nothing will improve. In fact, a shiny new cover can give you false confidence that the job is done while the real problem continues underneath. Inspect duct boots for damage or rust before installing anything new, especially in homes built before 2000 where original sheet metal boots are common and often show significant wear.
Mistake 3: Replacing supplies without checking returns
This one surprises a lot of homeowners. Your HVAC system needs to pull as much air back through return vents as it pushes out through supply registers. If your return vents are undersized, blocked, or in the wrong locations, replacing supply registers helps very little. The pressure imbalance creates negative pressure in rooms, which pulls outside air through gaps in windows, doors, and walls. In Avondale, that means hot, dusty outside air working its way into your home even when the AC is running hard.
Mistake 4: Choosing the wrong material for Arizona's climate
Plastic registers look fine in the store. They cost less and come in more decorative styles. But Arizona's heat cycle, with interior temperatures swinging from 68°F in winter to over 80°F in summer near sun-exposed floors, causes plastic to warp and discolor within a few years. Steel or aluminum registers last two to three times longer in our climate and maintain a tighter seal against the floor or wall surface.
When to stop and call a professional
If you open a duct boot and see disconnected flex duct, standing water stains, heavy mold, or seriously collapsed sheet metal, the scope of the job has gone beyond a register swap. These issues require an HVAC professional who can access, repair, and rebalance the duct system properly. Pushing forward with a DIY register replacement over these conditions is like putting a fresh coat of paint on a water-damaged wall. It looks better temporarily but the problem continues underneath.
Need professional help? Avondale's vent and duct experts are ready
If you run into tricky ductwork, persistent airflow problems, or just want expert assurance, here's how local pros can help.
Sometimes a vent replacement reveals a bigger picture. Rusted boots, disconnected ducts, pressure imbalances, or air quality concerns that go beyond what new registers can fix. That's exactly where professional service makes the difference between a temporary fix and a lasting solution.
At Air Duct and Dryer Vent Cleaning Avondale, we specialize in the full range of services Avondale homeowners need for clean, efficient, and comfortable indoor air. Our air vent replacement services cover everything from single register swaps to complete system rebalancing. Our air vent cleaning experts remove the buildup that reduces airflow and compromises air quality, and our indoor air quality testing gives you a clear picture of what's actually circulating through your home. We offer flexible scheduling, including after-hours appointments, backed by service warranties and a local team that knows Avondale homes inside and out.
Frequently asked questions
How do I know if my vents need replacement instead of cleaning?
Replace vents if they're visibly damaged, rusted, bent, or continue showing poor airflow even after thorough cleaning. Replacing damaged vents reduces system resistance and improves air quality in ways that cleaning alone cannot achieve once the physical structure is compromised.
Can I replace all vent types myself or do some require a professional?
Standard decorative register swaps are straightforward DIY projects that most homeowners can complete in under 30 minutes per vent. However, boot and duct replacement should always be handled by a professional to ensure proper fit, sealing, and system balance.
How much energy can I save by upgrading my vents?
Savings depend on how unbalanced your current system is, but smart vents in unbalanced homes save 15 to 40% on conditioning costs, while duct sealing adds another 10 to 20% in most Arizona homes.
What's the most common mistake when replacing vents?
Measuring the old cover instead of the duct opening is the number one error. Always measure the duct opening precisely for a proper fit, and use metal over plastic for the durability Arizona's climate demands.