TL;DR:
- Damaged or poorly fitted vents reduce airflow, increase energy costs, and worsen indoor air quality.
- Proper measurement, sealing, and metal material are key to effective vent replacement.
- Professional help is essential for duct damage, dryer vents, or ensuring code compliance in Avondale.
If your home feels stuffy, your energy bills keep climbing, or you notice dust settling right after you clean, your vents may be the problem. Old, damaged, or poorly fitted vents force your HVAC system to work harder, pushing up costs and pulling down your indoor air quality. For homeowners in Avondale, Arizona, where summer heat is relentless and desert dust is a daily reality, a failing vent is more than an inconvenience. It is a health and budget issue. This guide walks you through every stage of vent replacement, from spotting the warning signs to verifying that your new vents are working as they should, so you can breathe easier and spend less.
Table of Contents
- Understanding when and why to replace home vents
- Essential tools and materials for vent replacement
- Step-by-step guide: Removing, measuring, and installing new vents
- Troubleshooting and common mistakes in vent replacement
- Verifying results: Improving air quality and efficiency post-replacement
- What most guides miss about vent replacement in Avondale homes
- Your next step: Enjoy cleaner, more efficient air at home
- Frequently asked questions
Key Takeaways
| Point | Details |
|---|---|
| Recognize vent issues | Identifying damaged or inefficient vents is the first step to improving air quality and saving energy. |
| Prepare with proper tools | Gather essential supplies like quality metal vents, screwdriver, and seals for a successful replacement. |
| Follow correct installation steps | Careful removal, measurement, cleaning, and sealing ensure your new vent works safely and efficiently. |
| Avoid DIY pitfalls | Knowing the most common mistakes helps prevent drafts and protects long-term air quality. |
| Verify and maintain | Checking results and scheduling maintenance delivers lasting comfort and energy savings. |
Understanding when and why to replace home vents
Most homeowners do not think about their vents until something goes obviously wrong. But by then, the damage to air quality and energy efficiency has often been building for months. Knowing the warning signs early puts you in control.
Here are the most common signs your vents need replacing:
- Visible rust, cracks, or warping on the vent cover or register
- Loose or wobbly fittings that no longer sit flush against the floor or wall
- Persistent dust buildup around the vent opening, even after regular cleaning
- Weak or uneven airflow coming from certain rooms
- Rattling or whistling sounds when your HVAC system runs
- Discoloration or mold growth around the vent frame
Any one of these signs is worth taking seriously. Two or more together means it is time to act.
The benefits of vent replacement go well beyond aesthetics. New vents allow your HVAC system to distribute conditioned air more evenly, which reduces the strain on the blower motor and lowers your monthly energy costs. They also stop gaps from letting in dust, allergens, and even pests, all of which are bigger concerns in a desert climate like Avondale's. Families with asthma or allergies often notice a real difference in comfort within days of a replacement.
There is also a safety angle that many homeowners overlook. Damaged vents near dryer exhaust lines can create fire hazards if lint accumulates in the gaps. Staying on top of changing air filters is part of the same routine, but it is not a substitute for replacing a physically compromised vent.
Now, the big question: should you do it yourself or call a professional?
When to DIY vs. when to hire a pro: Floor registers are easy for most homeowners to swap out themselves, but full duct systems and dryer vents require professional handling to ensure code compliance and safety. If you are only replacing a surface cover or register, DIY is a reasonable choice. If the ductwork itself is damaged, or if you are dealing with a dryer vent, always bring in a licensed technician.
The distinction matters because improper dryer vent installation is one of the leading causes of residential fires in the U.S. Do not let a cost-saving shortcut become a costly mistake.
Essential tools and materials for vent replacement
Good preparation makes the difference between a smooth 20-minute job and a frustrating afternoon. Before you pull out a single screw, make sure you have everything on hand.
Core tools and materials checklist:
- Flathead and Phillips screwdrivers
- Tape measure
- Utility knife or putty knife
- Replacement vent register or cover
- Foam weatherstrip tape or mastic sealant
- Vacuum with a hose attachment
- Flashlight or headlamp
- Work gloves
One detail that trips up a lot of first-timers is measuring incorrectly. You measure the duct opening, not the decorative cover sitting on top of it. For example, a duct that measures 4 inches by 10 inches needs a register labeled 4x10, even though the cover itself will be slightly larger to overlap the edges. Getting this wrong means a return trip to the hardware store and a gap that lets conditioned air escape.
Here is a quick comparison of vent cover materials to help you choose:
| Material | Durability | Cost | Best for |
|---|---|---|---|
| Steel or aluminum | High | Moderate | High-traffic floors, long-term use |
| Cast iron | Very high | Higher | Older homes, heavy-duty needs |
| Plastic | Low | Low | Temporary use, low-traffic areas |
| Wood | Medium | Varies | Aesthetic match in older homes |
Metal registers, particularly steel or aluminum, are the clear winner for most Avondale homes. They hold up against heat, do not warp, and seal more reliably than plastic or wood alternatives.
For specialty applications like crawl spaces or exterior walls, foundation vent covers with dampers give you control over airflow in different seasons, which is useful even in Arizona's mild winters.
Pro Tip: Before installing a new register, use your vacuum to clean out the first 12 inches of the duct opening. Dust and debris packed near the opening will reduce airflow even with a brand-new cover in place. If the buildup is significant, consider scheduling duct cleaning services before completing the replacement.
The installation process itself involves removing the old register by lifting or unscrewing it, cleaning the duct opening, measuring accurately, and then installing the new metal register either flush or surface mounted, sealing any gaps around the frame.
Step-by-step guide: Removing, measuring, and installing new vents
With your tools ready, you can now proceed to replace your vents. Follow these steps in order and take your time with the measuring stage. Rushing there is where most mistakes happen.
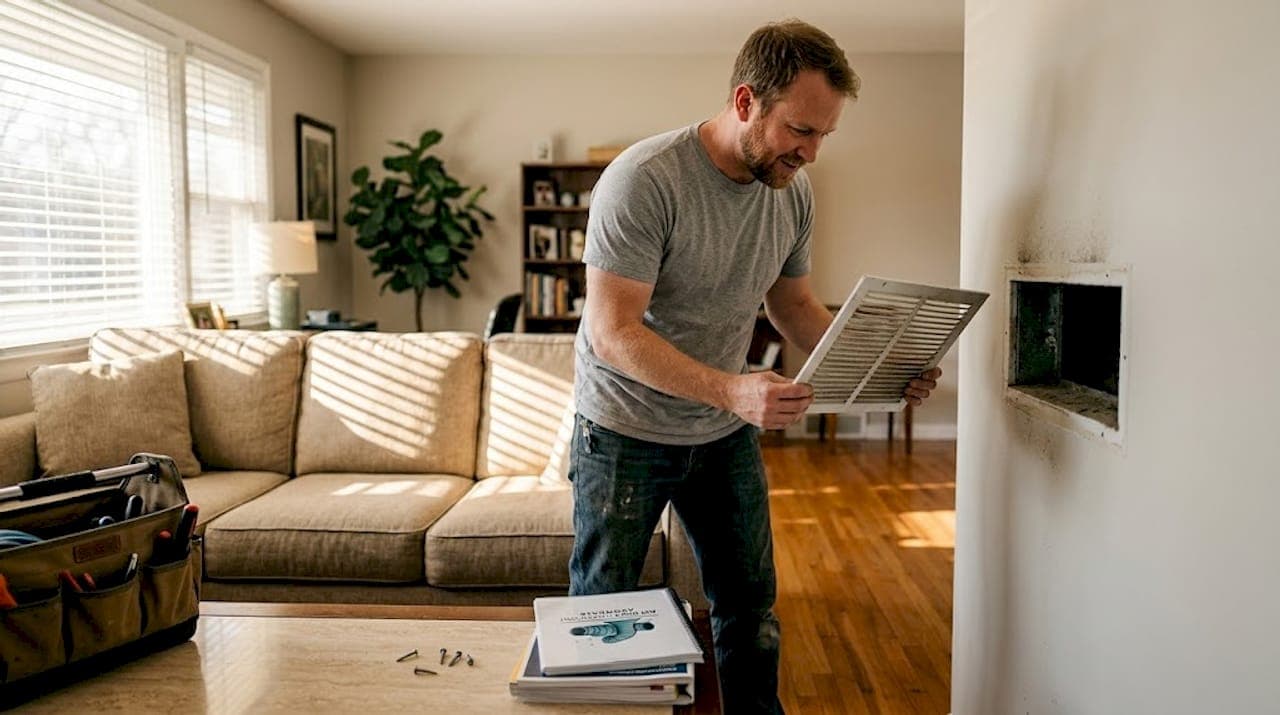
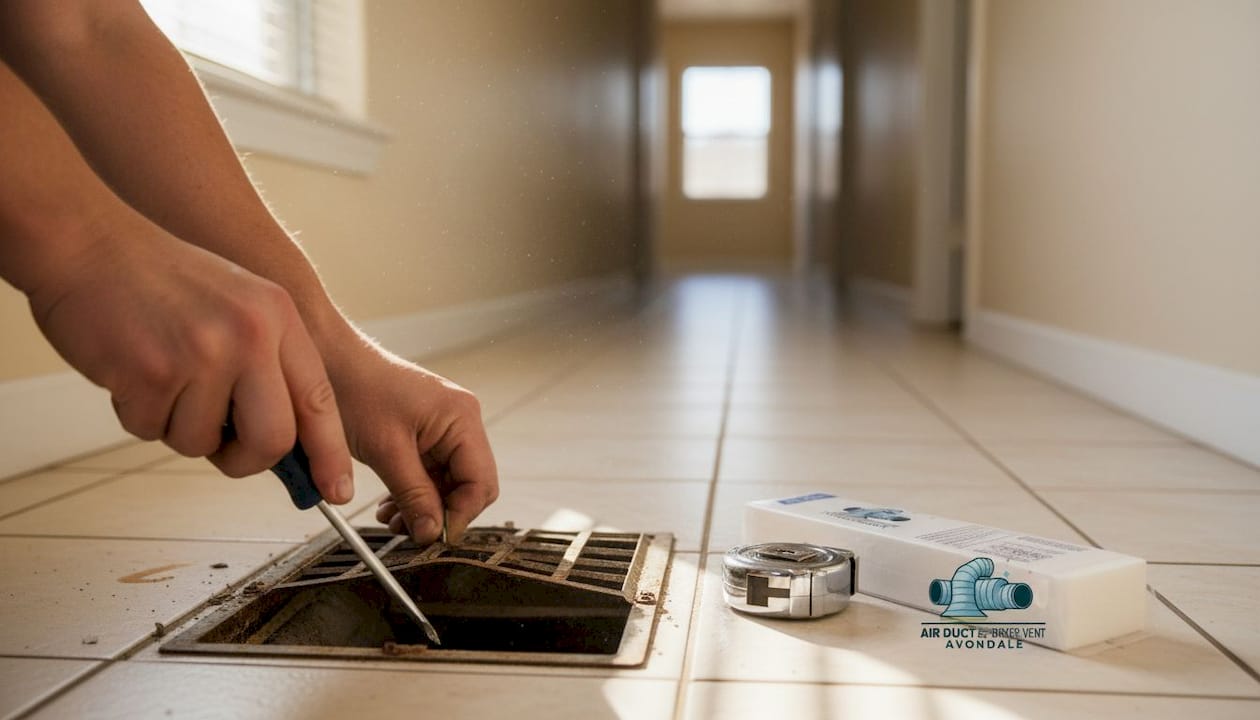
- Remove the old vent. For floor registers, lift straight up. Many are not screwed in at all. For wall or ceiling vents, use a screwdriver to remove the mounting screws. Set the old register aside.
- Inspect the duct opening. Shine your flashlight into the duct. Look for visible debris, mold, or signs of pest activity. If you see any of those, stop and address them before continuing.
- Clean the duct opening. Use your vacuum hose to remove loose dust and debris from the first foot or so of the duct. Wipe the edges of the duct frame with a damp cloth and let it dry.
- Measure the duct opening. Measure the inner width and height of the duct hole, not the old cover. Write it down. Double-check it.
- Select and prepare your new register. Match the duct dimensions to your new register. If the new register has adjustable louvers, test that they open and close smoothly before installation.
- Install the new register. Drop or press the new register into place. For a flush mount, it should sit level with the floor or wall surface. For a surface mount, it overlaps the edges of the duct opening.
- Seal any gaps. Use foam weatherstrip tape or mastic sealant around the frame where the register meets the floor or wall. This step is critical for preventing air leaks.
Here is a quick comparison of mounting styles:
| Mount type | Appearance | Sealing ease | Best for |
|---|---|---|---|
| Flush mount | Clean, seamless | Moderate | New construction, smooth floors |
| Surface mount | Slight overlap visible | Easier | Older homes, uneven surfaces |
For more involved projects, reviewing DIY duct cleaning guidance alongside this process helps you tackle the full system, not just the surface cover.
Pro Tip: If you are replacing multiple vents, start with the rooms that feel the most uncomfortable or show the worst airflow. You will notice the improvement faster, which helps you confirm the process is working before you move through the whole house.
For anything beyond a simple register swap, such as damaged duct sections or vents connected to your dryer exhaust, professional vent replacement is the right call. The stakes are too high to guess. These floor register replacement tips cover the basics well, but professional assessment covers what DIY cannot.
Troubleshooting and common mistakes in vent replacement
Completing the installation may present unexpected challenges. Even careful homeowners run into issues. Knowing what to watch for saves you from repeating the job.
The most frequent mistakes during vent replacement include:
- Using the wrong size register. Measuring the old cover instead of the duct opening is the number one error. A register that is too small will not cover the opening; one that is too large will not sit properly.
- Skipping the sealant step. Gaps around the frame let conditioned air escape into the wall or subfloor cavity, which means your HVAC system runs longer and your bills go up.
- Choosing plastic over metal. Plastic covers warp in high-heat environments and do not seal as reliably. Metal is preferred for durability and long-term performance over plastic or wood, especially in Arizona where floor temperatures near exterior walls can get surprisingly high.
- Not inspecting the duct before installing. A new cover over a dirty or damaged duct does not fix the underlying problem. It just hides it.
- Forcing a stuck register. Old registers sometimes bond to the floor with paint or grime. Use a putty knife to gently break the seal rather than yanking, which can crack the flooring.
Improperly installed vents create more than comfort problems. Gaps and misaligned covers allow dust, pet dander, and mold spores to enter your living space more easily. In Avondale, where fine desert dust is a constant presence, even a small gap around a vent frame can noticeably worsen indoor air quality over a few weeks.
A word of caution: If you open a duct and find signs of mold, significant pest debris, or damage to the duct lining itself, do not proceed with a DIY fix. These situations require a professional assessment. Attempting to seal over mold or pest contamination without proper remediation will make the problem worse, not better.
For anything involving the duct system itself rather than just the surface register, the team at duct replacement experts can assess the full scope of the issue and recommend the right fix. Some problems look like a simple register swap but turn out to involve duct separation or lining damage that only a trained eye will catch.
Verifying results: Improving air quality and efficiency post-replacement
After installation, it is important to confirm everything functions as it should. A new vent that is not seated correctly or is partially blocked will underperform, and you might not notice until your next energy bill arrives.
Here is how to verify your replacement was successful:
- Hold your hand near the vent when the HVAC runs. You should feel consistent airflow. Weak or uneven flow suggests a sealing issue or a blockage further in the duct.
- Check for rattling or vibration. A properly installed register sits flush and stays quiet. Noise means it is loose or not fully seated.
- Look for visible gaps around the frame. Run your finger around the edge. Any gap you can feel is a gap that is leaking air.
- Monitor your energy bills over the next 1 to 2 months. Properly sealed and functioning vents reduce the load on your HVAC system. Most Avondale homeowners notice a measurable drop in cooling costs after replacing multiple damaged registers.
- Pay attention to room comfort. Rooms that used to feel stuffy or uneven in temperature should stabilize within a few days of a successful replacement.
Proper vent replacement directly impacts home air quality and efficiency, and the results are usually noticeable fairly quickly.
Statistic to keep in mind: The U.S. Department of Energy estimates that leaky ducts can account for 20 to 30 percent of the energy used for heating and cooling in a typical home. Even a few poorly sealed vents contribute to that loss.
For long-term maintenance, add vent inspections to your seasonal home checklist. Every spring and fall, take 10 minutes to check each register for damage, debris, or loose fittings. Pair that with regular dryer vent cleaning to keep your full ventilation system running safely and efficiently. Small habits like these prevent the kind of gradual decline that leads to expensive repairs down the road.
What most guides miss about vent replacement in Avondale homes
Most vent replacement guides are written for a generic American home in a temperate climate. They do not account for what it is actually like to maintain a home in Avondale, and that gap matters.
Arizona's extreme summer heat puts unusual stress on HVAC systems. When outdoor temperatures regularly exceed 110 degrees Fahrenheit, your system runs almost continuously for months. That constant operation accelerates wear on every component, including vent registers. Plastic covers that might last a decade in a milder climate can warp or crack within two or three years here. This is not a minor detail. It is the reason we consistently recommend metal registers to every Avondale homeowner we work with.
There is also the dust factor. Avondale's desert environment means fine particulate matter is always in the air. It settles into duct openings, packs around register frames, and works its way into your living space faster than most people expect. A vent that is even slightly misaligned becomes a dust entry point that undermines everything else you do for indoor air quality.
Code compliance is another area that generic guides gloss over. Arizona has specific requirements for dryer vent materials and routing that differ from other states. Skipping a professional assessment on those systems is not just risky for air quality. It can affect your homeowner's insurance and your ability to sell the home. Reviewing vent cleaning safety tips is a smart starting point, but local expertise is irreplaceable when it comes to compliance.
The families in Avondale who see the biggest improvements in comfort and energy costs are the ones who treat vent maintenance as a system, not a one-time fix.
Your next step: Enjoy cleaner, more efficient air at home
You now have a clear picture of what vent replacement involves and what it can do for your home. But knowing the steps and executing them perfectly are two different things, especially when your ductwork has years of desert dust and heat exposure behind it.
At Air Duct and Dryer Vent Cleaning Avondale, we handle every part of the process so you do not have to guess. From indoor air quality testing that reveals what is actually circulating through your home, to thorough air duct and vent cleaning that prepares your system for new registers, to full expert duct replacement when the damage goes deeper than the surface, our team brings local knowledge and professional tools to every job. Avondale homeowners deserve clean air and lower bills. Let us help you get there.
Frequently asked questions
How do I know if my home's vents need replacing?
Look for signs like rust, loose fittings, visible damage, or persistent dust around the vent frame. Weak or uneven airflow from certain rooms is also a strong indicator that replacement is overdue.
What tools are most important for DIY vent replacement?
You will need a screwdriver, a tape measure for accurate duct opening dimensions, a replacement vent register, and foam tape or mastic for sealing gaps around the frame.
Can vent replacement really improve indoor air quality?
Yes. New vents allow better airflow and eliminate the gaps that let dust and allergens enter your living space, which leads to noticeably cleaner and healthier air within days.
Should I choose metal, wood, or plastic vent covers?
Metal is preferred for durability and long-term safety over plastic or wood, particularly in Arizona's heat where plastic covers are prone to warping.
When should I call a professional instead of replacing a vent myself?
Call a pro for dryer vents or full duct replacement, or any time you are unsure about code requirements, since improper installation can create safety and insurance risks.